Place attributes
There are almost 400 Places categories and 90+ editable attributes. The following chapter provides an overview of Place attributes and how to use them.
1 Place attributes menu
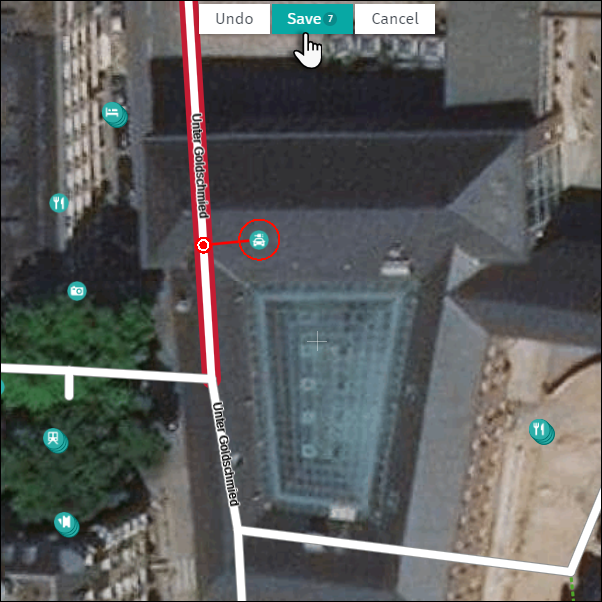
The “Place attributes” menu displays all Places attributes. To open the “Place attributes” menu:
1) If adding a new Place, select a Place category. The attributes menu will appear after the category is selected.
2) If editing an existing Place, the “Place attributes” menu opens after clicking on a Place.
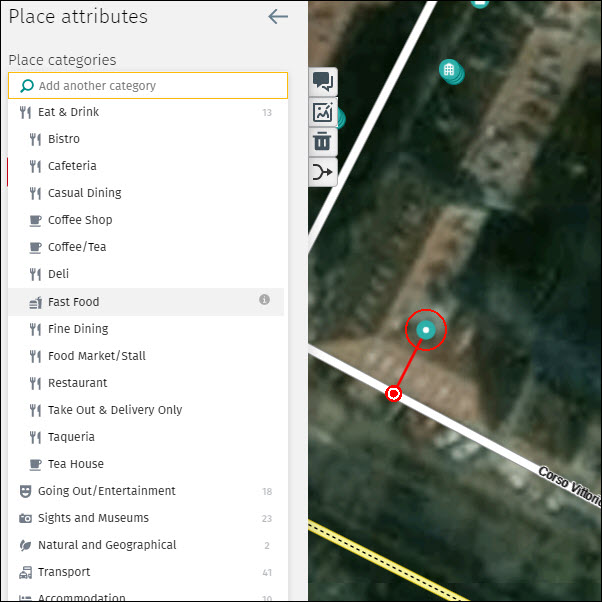
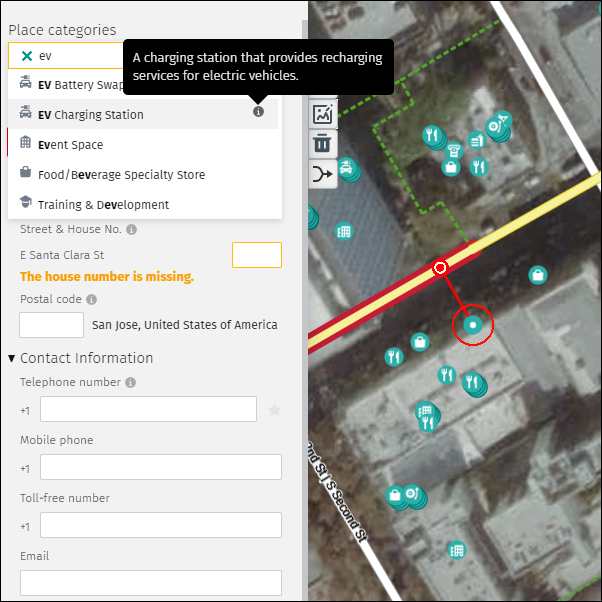
1.1 Place Category
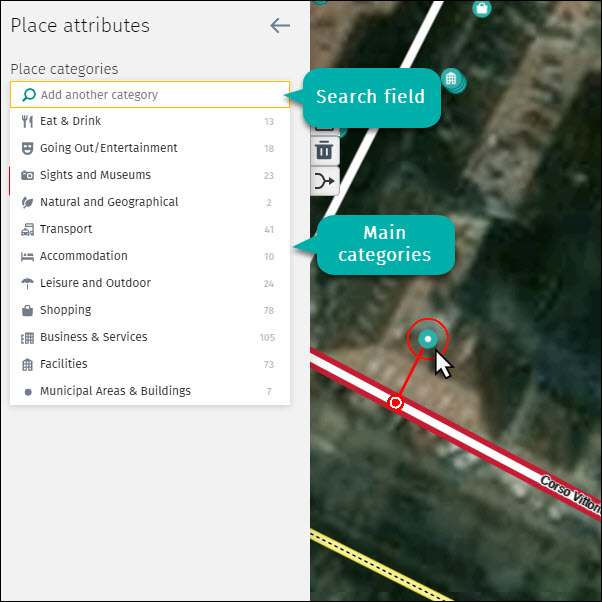
Map Creator offers almost 400 Places categories within 11 main categories. Search for a category using the search field or browse by expanding the main categories.
To choose a category:
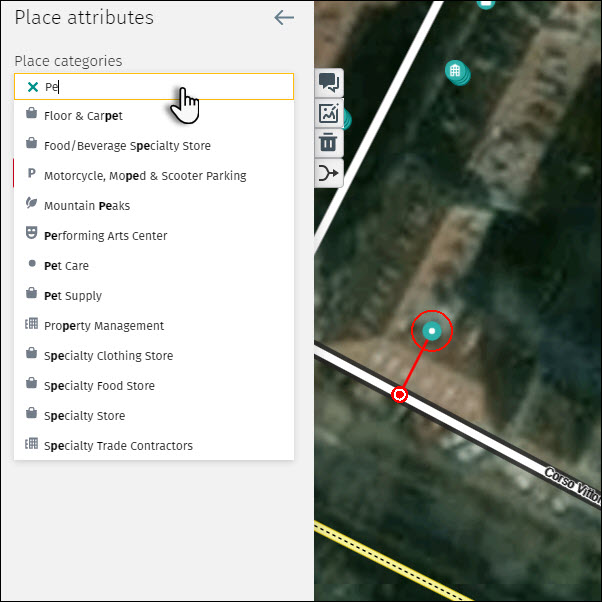
- Use the search field to enter a word describing the Place. After entering the first letters, Map Creator suggests potential categories.
- Browse within the main categories by expanding the menu and selecting from the available choices.
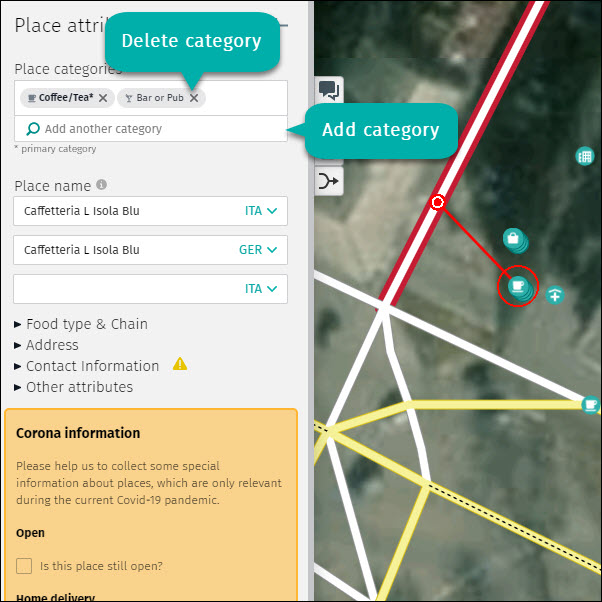
After the category is defined, the “Place attributes” opens with the following additional options:
- Add another category:
- Click “Add another category” to select more categories if needed.
- Note: Avoid creating illogical combinations (e.g. Restaurant + Optician).
- Note: Avoid adding excessive categories (e.g. a hotel with a meeting room is just a Hotel, not a Hotel + Convention/Exhibition Center).
- Delete a category:
- Delete categories by clicking the “x” after the category name.
- Note: You can only delete a category when two or more categories are listed.
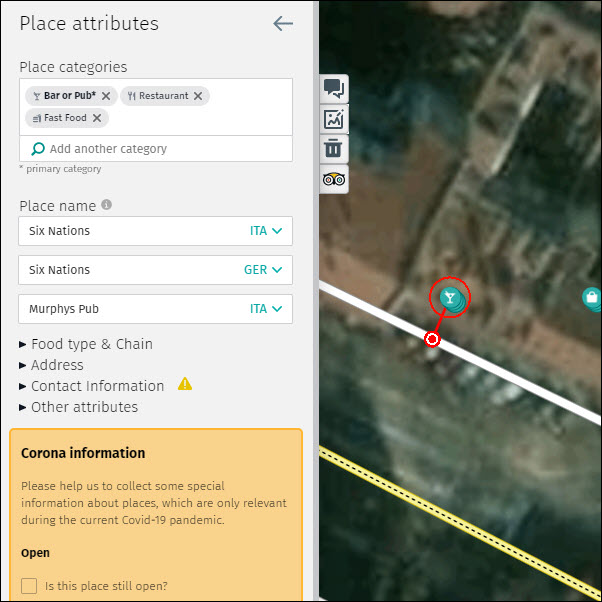
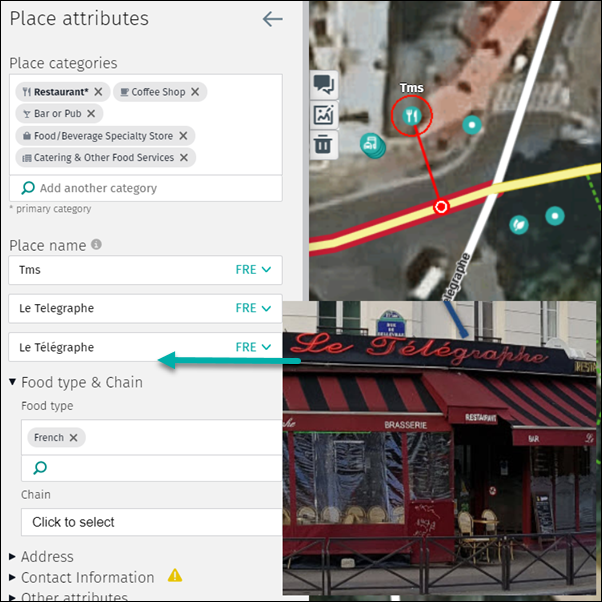
1.2 Place name
Use the naming field to enter the official name of the Place. Keep the following in mind:
- Add the Place name according to reality.
- Names are case sensitive.
- Letters, symbols and numbers are allowed when it reflects reality.
- Do not include the name of the category (e.g. “BP” and not “BP Petrol Station”).
- Do not include additional information in the name field (e.g. name of the owner, city name, etc.).
- If the Place is part of a chain use the chain name.
- Enter up to three names.
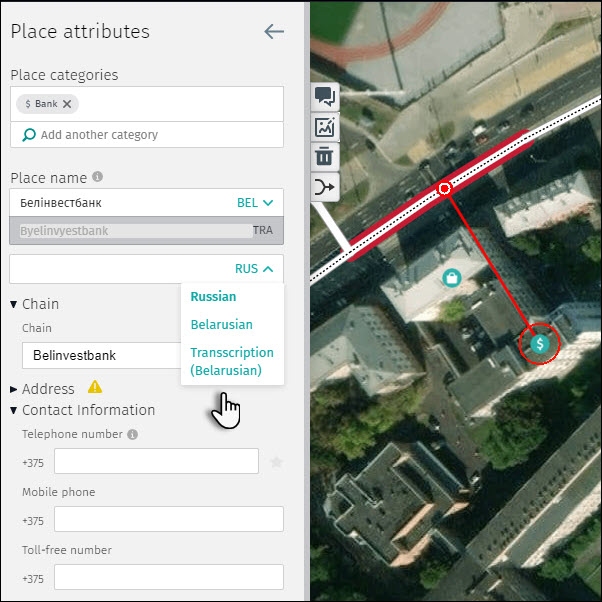
1.3 Language code
Language codes classify letters and numbers according to the country’s language set up. In countries with multiple official languages, it is important to select the correct language code from the drop-down menu. Keep the following in mind:
- In countries with one language, the language code is set by default.
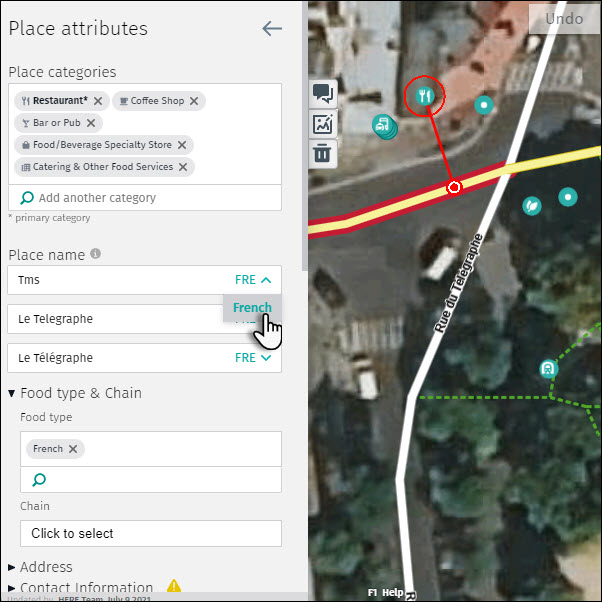
- In countries with multiple languages, select the appropriate language code by clicking the drop down list.
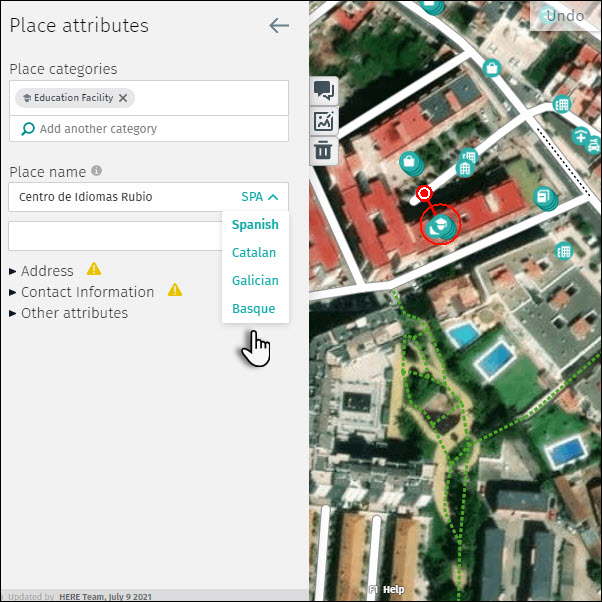
- In countries using languages with non-latin characters, an additional transcription is needed.
- If the transcription already exists, the transcribed name appears but is greyed out and not editable.
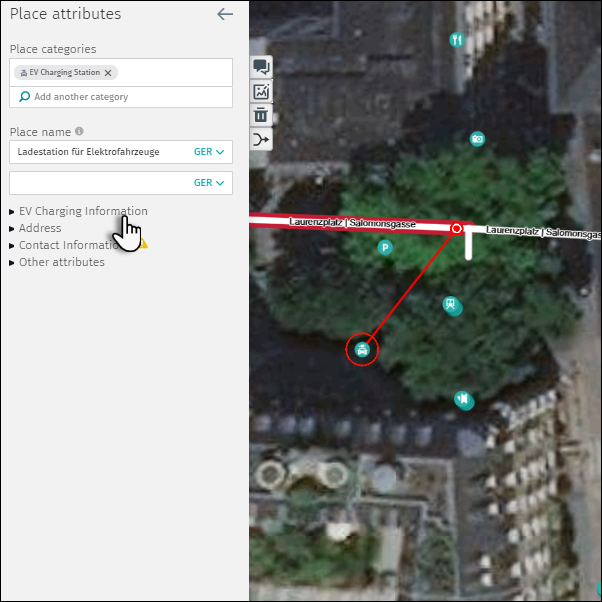
1.4 EV Charging Information
This chapter is related to the Place category “EV Charging Station” and gives an overview about the specific coding characteristics.
When editing an “EV Charging Station” keep the following in mind:
- Make sure that the Places layer is activated (see chapter Map Creator basics → Explore mode vs. edit mode).
- Add a new, modify or delete an existing “EV Charging Station”:
- Add: Click at the location in the map and use the right-mouse-click-menu and chose “Add new place” or click on the “Edit Toolbar” the “Add place” button and click at the correct location in the map (see chapter Place editing → 2 Adding a Place). Chose the category “EV Charging Station” and fill out the respective attributes according to reality.
- Modify: Click on an existing Place and update the attributes according to reality (see chapter Place editing → 3 Modifying a Place ).
- Delete: Delete a station if it has been removed from the location (see chapter Place editing → 4 Deleting a Place).
- When filling out the attributes then you should follow the description below:
- “Place name”: Enter the official name and chose the correct language code if multiple language codes exist (see chapter Place attributes → 1 Place attributes menu → 1.2 Place name).
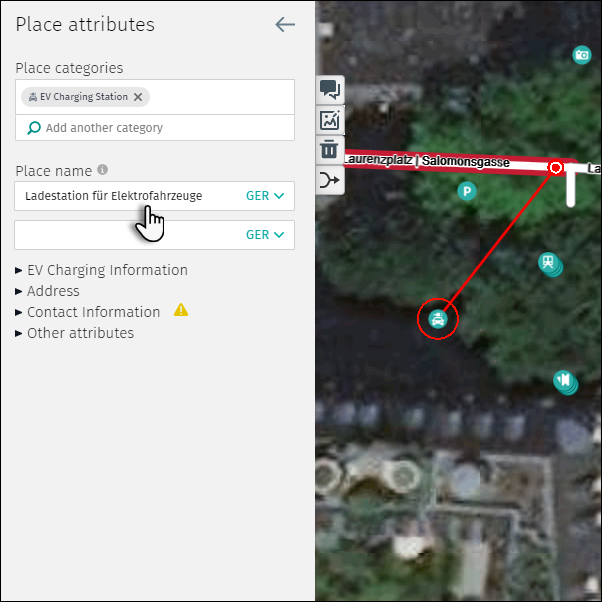
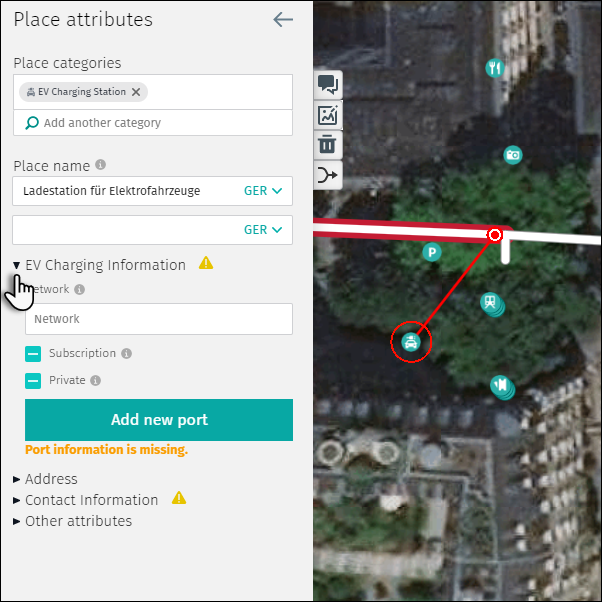
Beside the basic attributes (e.g. Name, Contact Information, …) the tool also offers the possibility to add special attributes called “EV Charging Information”. This chapter is available when the category has been chosen.
-
- “EV Charging Information”: Enlarge the chapter by clicking on the black triangle on the left side of the chapter name. The following attributes appear:
- “Network”: Enter the network name.
- “Subscription”: Click the checkbox if a subscription to the network is possible.
- “Private”: Click the checkbox if the station is of private nature.
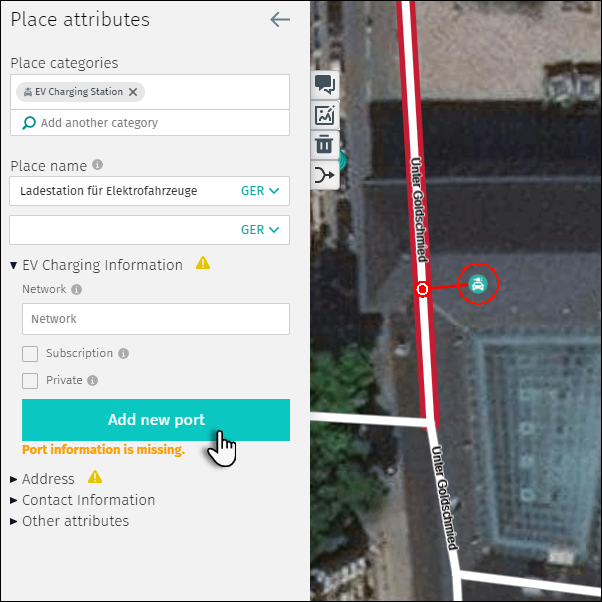
- “Add new port”: Click on the button to open the sub-chapter for the connector details.
- “EV Charging Information”: Enlarge the chapter by clicking on the black triangle on the left side of the chapter name. The following attributes appear:
-
-
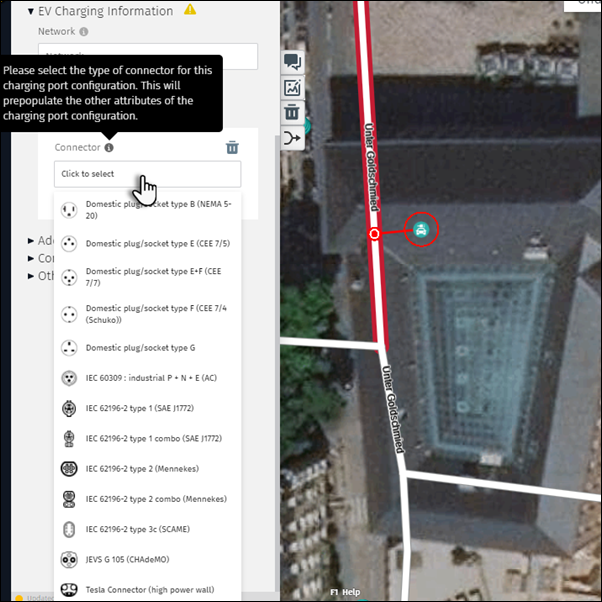
- “Connector”: Click on the field to open the dropdown menu and chose the respective connector type. All additional fields below will be filled out with default values but can be changed manually if needed (by entering a number, by the up and down arrows or by changing the checkboxes).
- “Trash can” – icon: Delete the configuration if necessary.
- “Current”: This gives information about the ampere power.
- “Voltage”: This gives information about the electrical potential.
- “AC” or “DC”: This gives information about the electrical direction.
- “Phase”: This gives information about the number of phases.
- “Mode”: This gives information about the mode of the configuration.
- “Number”: This gives information about the total number of ports of this configuration.
- “Connector”: Click on the field to open the dropdown menu and chose the respective connector type. All additional fields below will be filled out with default values but can be changed manually if needed (by entering a number, by the up and down arrows or by changing the checkboxes).
-
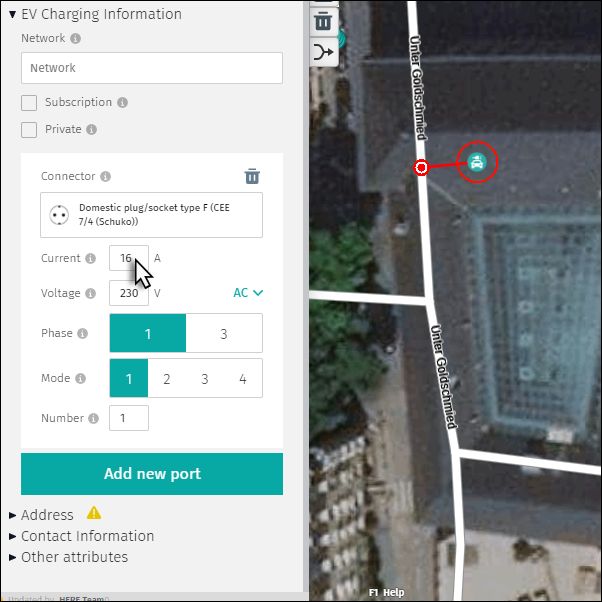
- If multiple connectors are available chose “Add new port” to configure another port.
- Additional information should be entered as well:
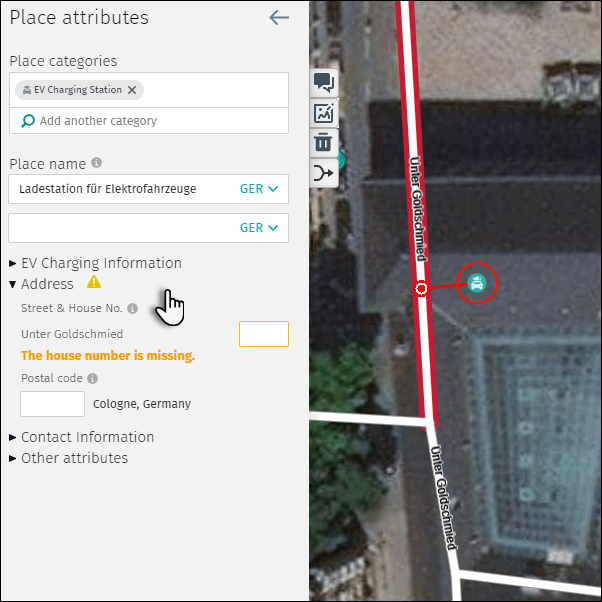
- “Address”: The street name is getting auto-populated from the road network. Enter the “House number” and the “Postal code” if applicable (see chapter Place attributes → 1 Place attributes menu → 1.7 Address).
-
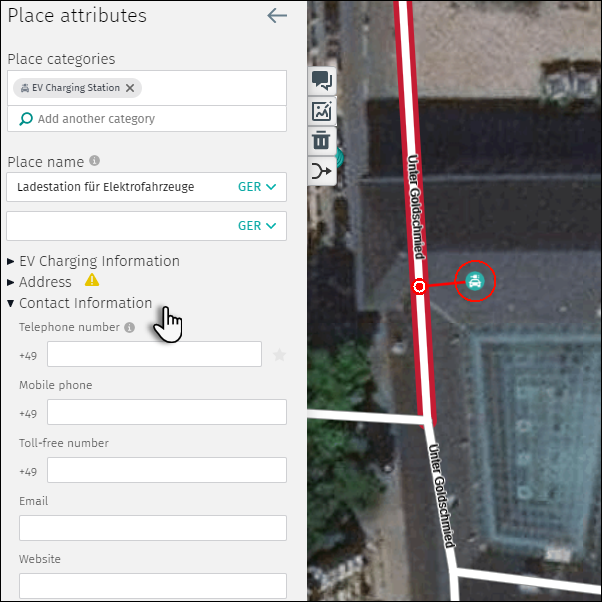
- “Contact Information”: In most cases you can find contact information details written on the station. Enter “Telephone number”, “Mobile number”, “Toll-free number”, “Email” and/or “Website” information of the network operator if applicable and chose the preferred contact for one of the entries (see chapter Place attributes → 1 Place attributes menu → 1.8 Contact information).
-
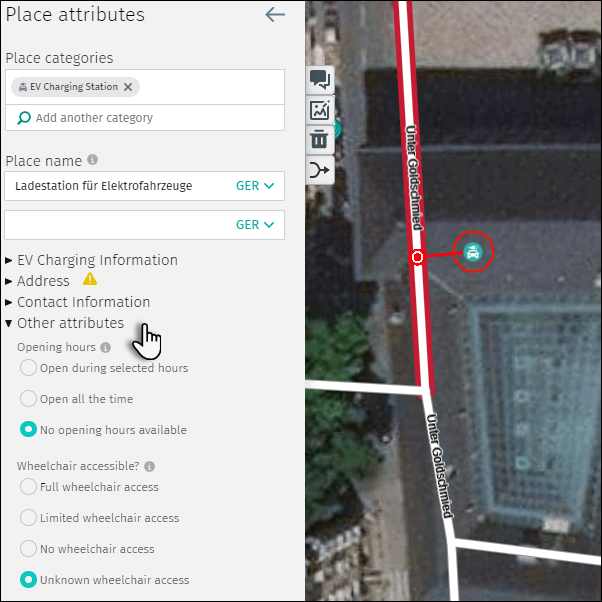
- “Other Attributes”: Within “Other Attributes” you can also chose “Opening hours” (see chapter Place attributes → 1 Place attributes menu → 1.9 Other attributes →1.9.1 Opening hours). and “Wheelchair accessibility” (see chapter Place attributes → 1 Place attributes menu → 1.9 Other attributes →1.9.2 Wheelchair accessible).
- When finished click “Save”.
Keep in mind:
- Move your mouse over the “i” button on the right side of each attribute. A help text will pop up with a brief description.
- Red and yellow warning triangles highlight important sections and make you aware about critical attributes that need to be included for a faster moderation of the “EV Charging Station” (see chapter Error messages).
- According to our accuracy guidelines it is also important to precisely define the location. Move the “Routing point” and/or “Display point” for better placement (see chapter Place editing tips).
- Additional functionalities are:
- “Start discussion” about this place: Discuss with other user about the Place (see chapter Additional Place editing tools → 2 Discussions).
- “Upload image”: An uploaded image is very helpful for our internal experts to better moderate and faster integrate your edit (see chapter Additional Place editing tools → 1 Upload a picture related to a Place).
- “Merge with another place”: In the case of duplicates in vicinity you can chose this option to simply merge those (see chapter Place editing → 5 Merging a Place).
- When adding or modifying an “EV Charging Station” then the following rules should be applied:
- “EV Charging Stations” should always be a single Place without any combination of other categories.
Real world examples:
Example 1
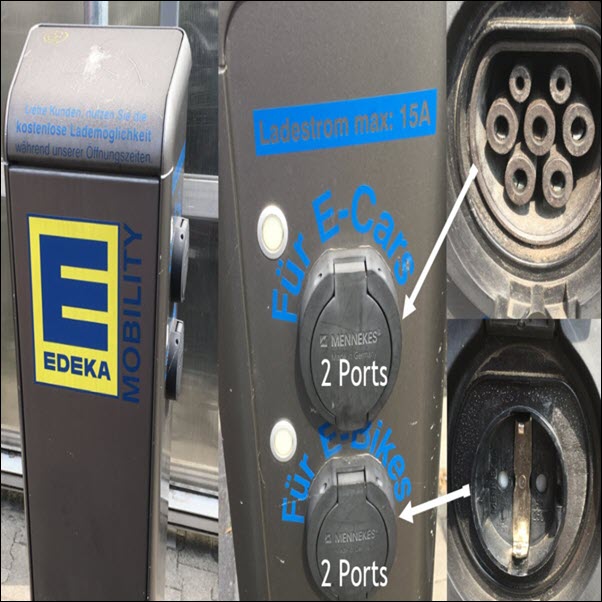
Information from the image:
- Name/Network : EDEKA Mobility
- Connector: 2 x IEC 62196-2 type 2 for E-cars and 2 x Domestic plug/socket type F (CEE 7/4) for E-bikes
- Current: 15 A
- Private: Yes (“kostenlos” → no charge)
- Opening hours: Open during selected hours (“während unserer Öffnungszeiten” → during our opening hours)


Example 2

Information from the image:
- Name/Network : InCharge, Vattenfall, Station 015037
- Connector: 2 x IEC 62196-2 type 2 for E-cars, 2 x Domestic plug/socket type F (CEE 7/4) for E-bikes
- Current: 16 and 32 A
- Subscription: Yes
- Contact Information: Toll-free number 0800-2335335


1.5 Food type
The food type must be defined for categories within the main category “Eat & Drink.” A few tips:
- Use the food type which best describes the menu of the Place.
- If you are unable to choose the specific food type which best describes the menu then use a more generic food type like “International” or a regional type (e.g. African, European, etc.).
- Multiple food types may be added for a single Place but use them sparingly.
- Avoid illogical food type combinations (e.g. Pizza + Chinese).
Editing food type:
- Adding a food type:
- Enter a food type in the “Search for a food type to add” field.
- After entering the first letter, a list of suggestions appears.
- Deleting a food type:
- Delete a food type by clicking on the “x” in front of the food type.

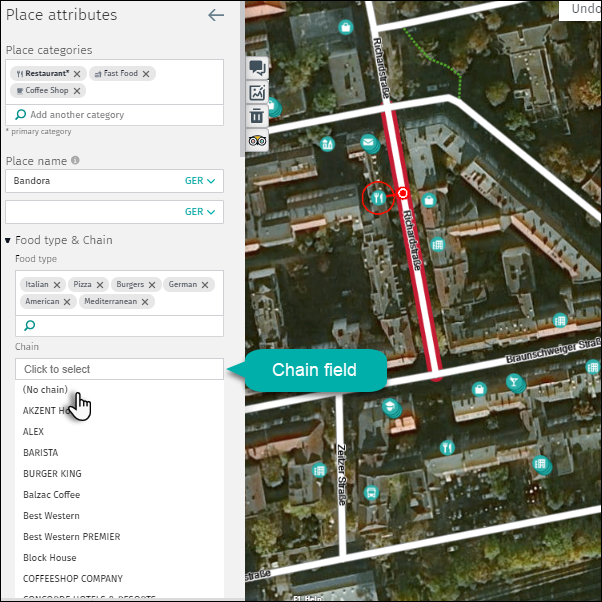
1.6 Chain
The chain is the brand or trade name of a Place (e.g. BP, McDonald’s).
If the Place belongs to a chain:
- Click on the chain field and select a chain from the drop-down menu.
- Alternatively, begin typing the name and Map Creator will offer suggestions.
- If the chain is not in the list click on “No Chain”
- If the chain is on the list, the previously entered Place name should match the chain name.
1.7 Address
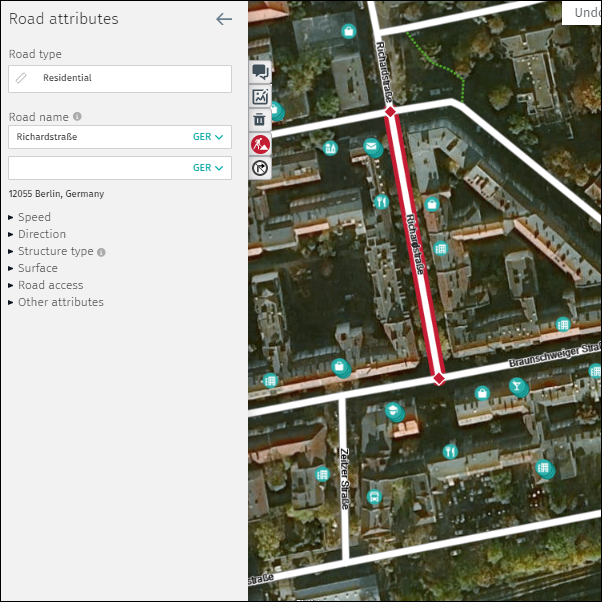
1.7.1 Street name
The street or road name is derived from the road where the routing point is attached. The road name is not editable within the “Place attributes” menu.
- If the road name is missing or needs updating go to the “Road attributes” menu and add or update the road name.
- If the routing point is located incorrectly move it to the correct road. The road name will update accordingly in the Places menu.
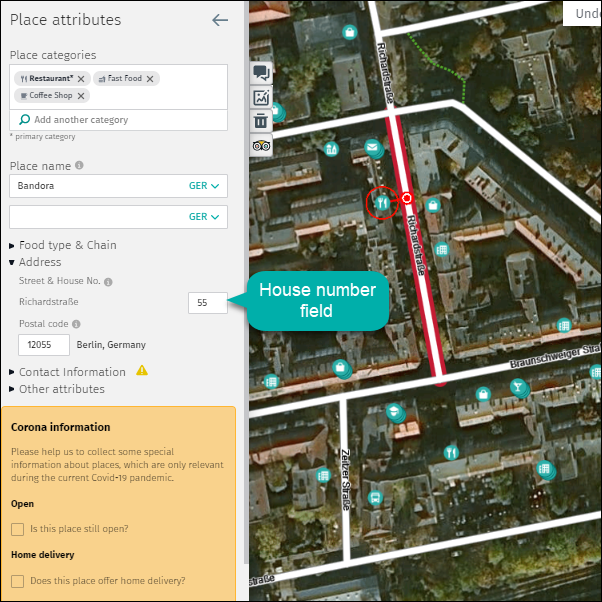
1.7.2 House number
The house number provides the address information for the Place. House numbers should be entered according to reality and various formats are supported (e.g. N123W12312, A12/123, AB-12, 12A, 40, Блок 12345 Б, etc.).
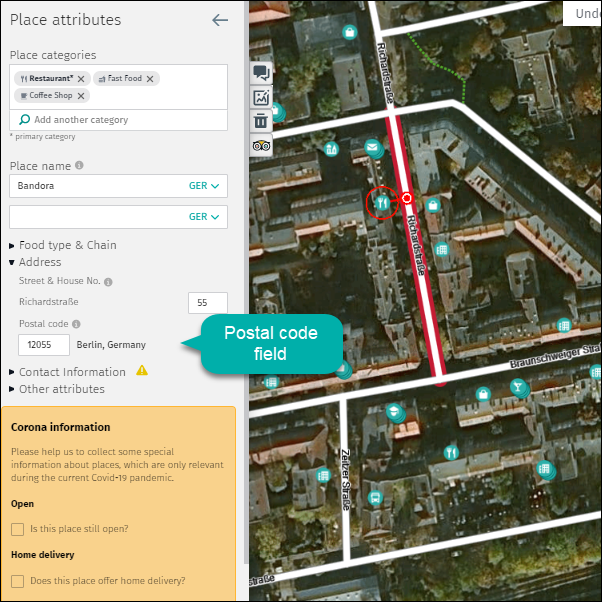
1.7.3 Postal code
Enter the correct postal code to complete the address section.
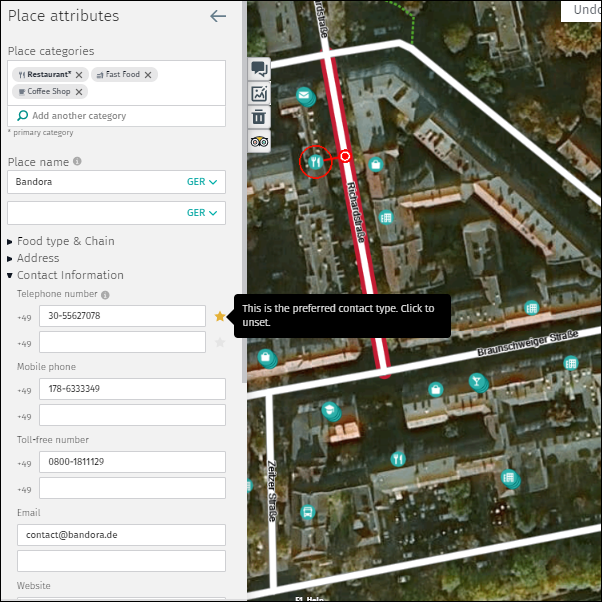
1.8 Contact information
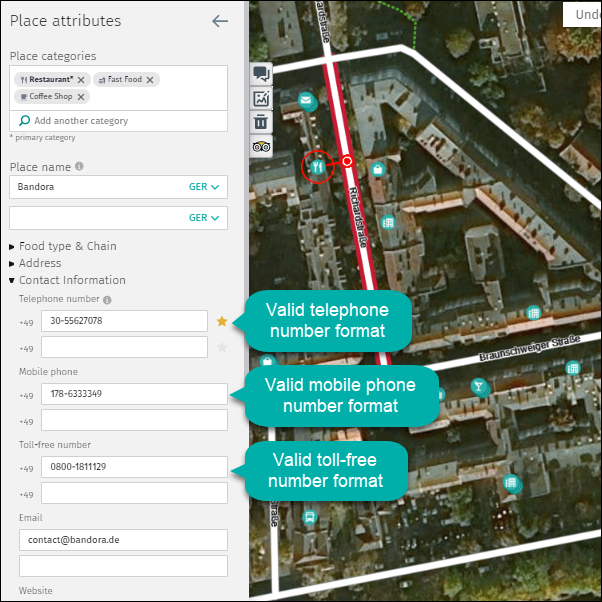
1.8.1 Telephone number
- Enter a telephone number if available.
- Landline numbers are preferred.
- The country code defaults to the country where the Place is located.
- Enter the telephone number in this format:
- Area code (without leading 0) followed by a dash and the rest of the phone number (e.g. 30-7581234).
- If there is no area code, simply add the telephone number.
- Map Creator validates telephone number format in real time and may add an area code automatically.
- An error message appears if the field contains characters other than numbers and one dash.
- Up to three telephone numbers can be entered.
1.8.2 Mobile phone
- Enter a mobile phone number if available.
- The country code is set according to the country definition and cannot be changed.
- The country code defaults to the country where the Place is located.
- Enter the mobile telephone number in this format:
- Area code (without leading 0) followed by a dash and the rest of the mobile phone number (e.g. 30-7581234).
- If there is no area code, simply add the mobile telephone number.
- Map Creator validates telephone number format in real time and may add an area code automatically.
- An error message appears if the field contains characters other than numbers and one dash.
- Up to two mobile telephone numbers can be entered.
1.8.3 Toll-free number
- Enter a toll-free telephone number if available.
- The country code defaults to the country where the Place is located.
- Enter the toll-free telephone number in this format:
- Area code followed by a dash and the rest of the toll-free phone number (e.g. 30-7581234).
- If there is no area code, simply add the toll-free telephone number.
- Map Creator validates telephone number format in real time and may add an area code automatically.
- An error message appears if the field contains characters other than numbers and one dash.
- Up to two toll-free telephone numbers can be entered.
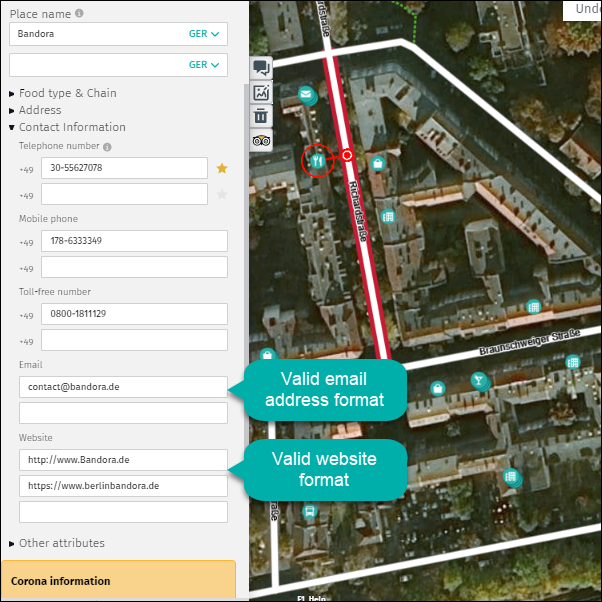
1.8.4 Email
-
- Enter an email address if available.
- Follow standard email address format:
- mail@example.com
- If the address contains invalid characters, an error message appears.
- Up to three email addresses can be entered.
1.8.5 Website
-
-
- Enter a URL if available.
- Follow standard URL format:
- https://www.example.com
- If the URL contains invalid characters an error message appears.
- Up to three URL can be entered.
-
1.8.6 Preferred contact type
A star icon appears next to each piece of entered contact type.
Click the star to set the corresponding contact type as the preferred contact method.
The star is not visible until some form of contact information is entered.
1.9 Other attributes
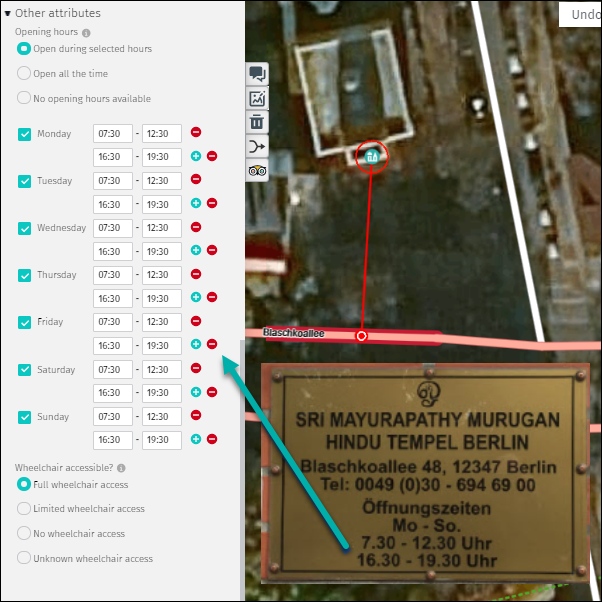
1.9.1 Opening hours
Opening hours define the time period when a business is open. There are three options:
- “Open during selected hours”
- If this circle is checked, a menu appears allowing entry of opening hours for each day of the week.
- Activate the days by clicking the checkbox for each day the Place is open.
- The time fields open and you can enter opening and closing times.
- Up to three time periods can be entered per day when clicking on “+” to activate the next field.
- Click the red “-” to delete entered time periods.
- “Open all the Time”
- Choose this option if the Place is open 24 hours.
- “No opening hours available”
- Choose this option when you have no information about opening hours.
Tip:
- If opening hours are the same during the work week, activate Monday, enter the time period and then activate the following days and the time period will be copied over.
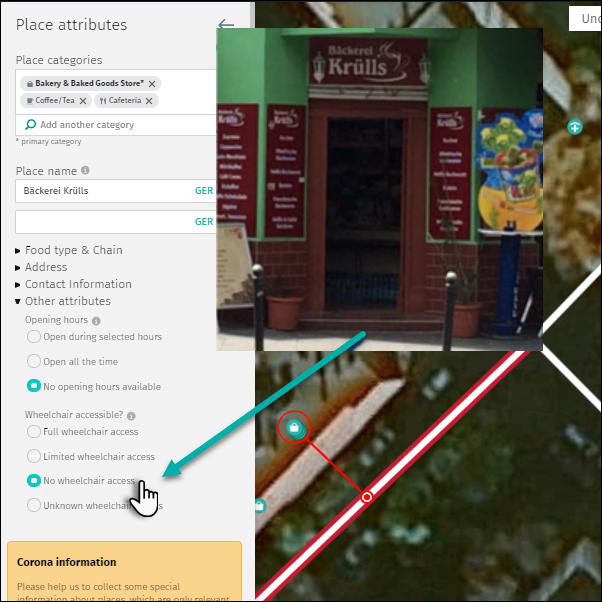
1.9.2 Wheelchair accessible
This attribute reflects if a Place can be entered using a wheelchair. There are four options:
- “Full wheelchair access”
- Select if the entire Place is wheelchair accessible.
- “Limited wheelchair access”
- Select if parts of the Place are wheelchair accessible.
- “No wheelchair access”
- Select if the Place is wheelchair inaccessible.
- “Unknown wheelchair access”
- Select if you have no information about wheelchair accessibility.